Monday, June 16, 2014
Zippered Art Pouch
Tuesday, January 7, 2014
Sewn Journal Cover
Thursday, September 19, 2013
Long time no posts
Fist off my dad had a couple of strokes back to back and was in the hospital for 7 days and has been in rehab ever since so this has taken a lot of my time and thoughts. I wanted to share a few pictures of so of the new things that I am working on for a new digital release in my Etsy shop.
Tuesday, November 27, 2012
Nook Simple Touch Cover
Wednesday, November 7, 2012
Felt Bobbles
I am no really good sitting or laying around doing nothing, even if I am sick so I have been using my time wisely trying to make some small things for my studio open house. That I am hosting the first Friday night in December.
These little felted bobbles are just the beginning . I am planning on having them for sale there as well as have a few listed in my Etsy shop.
I have 8 round ones completed, and one heart. I like the heart one but I don't know about them. I would love a little feedback on them to know what you think. Each circle one is about 2 inches across.
Here is a close up of the stitching. These have really been fun to make and I have a lot cut out and ready to stitch.
Thursday, March 15, 2012
A Little Blog Break
I did not mean to take a blog break but Life happens. Lest weekend I took my girls to a conference for young girls and we had a great time. We stayed in a Dorm with about 50 other girls and there chaperones. Then my youngest got sick and was sick for a few days. So this is just a little explanation for my absents. I am trying to get back on schedule and will be hosting a new giveaway here tomorrow. It is going to be great so come back and check it out.
Friday, February 24, 2012
Friday Free for All
We woke up this morning to storms, lots of rain, thunder and lighting. It is gray and dreary outside to we will be staying home all day and I hope that I will be able to get a few projects finished.
I finished a bunch of lanyards and a dress last night. I even made an outfit for my daughter’s doll. She was so excited. I let her pick the fabrics, and made a skirt and peasant shirt for it.
I made this in a size 6-9mo. I really need a cute model to really show how it looks. I love the way it turned out.
When I make doll clothes I just use what ever color thread that is in the machine. I really like they way they colors turned out. A gray day really makes it hard to get a good picture. Maybe later.
Monday, February 13, 2012
Happy Monday
This idea came to me while I was shopping with my BFF and she found a fabric lanyard from a well know designer but could not find a bright print that she liked because most of the prints were very simlar. Well long story short she didn’t make a purchase so with her birthday this past weekend I decided to make her one with all the bright colors that she really loved. Needless to say the present was a hit.
All it took was a very small amount of fabric, some interfacing, a couple of burnt fingers (trying to iron something this small is very hard) and a small swivel lobsters clasp, and I had a perfect thin fabric lanyard. I added a small split ring key ring just incase a key was needed to be kept handy. I am planning on having a few in my Etsy Shop later this week, but first I have a make a larger order, thanks to my BFF wearing it to work this morning, for her office.
Wednesday, January 25, 2012
Show and Tell Thursday Linky Party
I have really been busy this week making a bunch of items for my etsy shop and I created a how to for my “Be My Puffy Valentine's. They are patchwork hearts that are made on a foundation fabric then stuffed. I used a bunch of my hand dyed fabrics and hand painted fabrics as parts of these, because I don’t really like to waste anything. These are made on a foundation so that you do not have to piece them you just have to zig zag over the edge of each piece to anchor them down.
Feel Free to add your link to the party here:
The Rules:
Please follow us with Google Friend Connect up on the left.
Link to your post not your main blog page
Link back here so that everyone can find us
You can also link your etsy shop and giveaways.
Leave a comment on the person before you and after you (Everyone Loves comments)
Come Back next week to see who is featured and for a new button for the features
Thursday, December 8, 2011
Scrap Scarf Sewing Tutorial
This Scrap Scarf Sewing Tutorial is very easy to make with just the sewing scraps that you have on hand. All you need is a good handful of sewing scraps and a little bit of muslin and you are all set to make a great Scrap Scarf.
Scrap Scarf Sewing Tutorial Supplies:
2 pieces of muslin measuring 5” x 72” (if you buy 2 yards of fabric and rip in into 5 inch pieces you should be able to get 9 pieces from each cut)
A good hand-full of various scraps. Long and narrow ones work best.
Thread (color of your choice because you really want it to show)
A sewing machine
Step one:
If you have not already prepared your base fabric do so now. I prefer to rip my muslin because it adds to the scrap look of the scarf.
Step two: organize your scraps so that they are easy for your to pick up with out too much thought and so that they will be random.
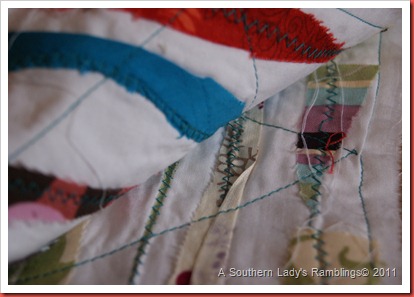
Step 3: Begin to sew them down the length of one piece of the base fabric. You can use a straight stitch or one of the many decorative stitches that are on most sewing machines. You could also just use a simple ziz-zag stitch.
Repeat step 3 going up and down the length of the base fabric until you are happy with the way it looks. (Note: I left a space of 1/4” inch between each row of scraps.)
Step 4:
Once you have finished sewing all the scraps down on the first base fabric, line up the second piece on the back with wrong sides together , you can pin to together at this point but I don’t bother with pinning.
With a medium stitch length sew around the edges about 1/4” in from the sides. I them used the same stitch length and sewed an extra large zig-zag pattern down the center of the finished scarf.
You can leave it just the way it is or your can add come embellishments to it.
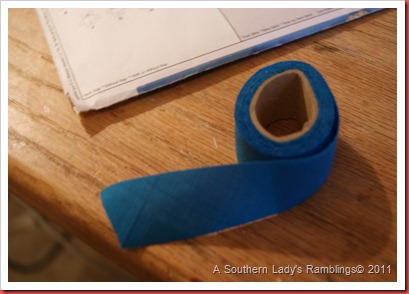
I have some vintage bias tape in my stash and I found one that matched my thread and decided to ruffle it. (To ruffle it all you have to do is set your machine to the longest stitch length and the tension to the highest setting and it will ruffle itself.)
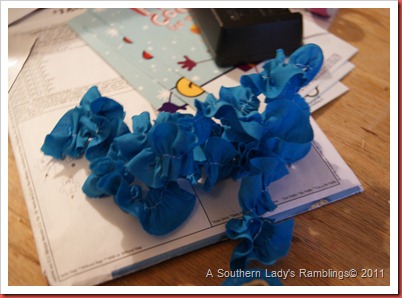
then I pinned it down in a shape that I liked and sewed over it with a very small stitch length.
If you would like a warmer scarf you can add either sew-in or iron on fleece. I hope that you enjoy this Scrap Scarf Sewing Tutorial, if you make one I would love to see it, just come back and add a link in the comments section. Next time you need a way to add pop to any outfit just remember this Scrap Scarf Sewing Tutorial.
Wednesday, November 30, 2011
Toilet Paper Cozy
Tuesday, November 29, 2011
Busy Hands
I have been busy measuring, cutting and sewing a good size wholesale order of Coffee Cup Cozies. I have really enjoyed picking out the fabrics for each of them. There was only one request that I had to fill for this order, 2 solid brown and 2 solid black ones. I had to go and pick up some solid fabric because I am always drawn to prints.
This is just a sample of the ones that I have that are a work in progress. I used a Cardboard cozy from Starbucks as a template. I cut them out and sandwiched a thicker piece of fabric in the middle before I sewed a zig zag across each line that I had drawn then I cut them out close to the edge and continued to use a zig zag stitch to finish each edge.
Thursday, November 10, 2011
Patterns Everywhere
I am getting ready to start sewing for Christmas present, so I decided to pull out the patterns that I have been collecting over the past few months. If Joann’s or Hobby Lobby had a pattern sale I seemed to be there at just the right time. I would only 2-3 at a time . . . . . .
Well that turned into a lot of patterns over time. The ones in the above are the McCall’s Patterns mostly bags and crafty items, With a PJ pattern for me.
There are only 3 Butterick patterns in the mix. A shirt, skirt and bag patterns is all that I choose pick that week that they were on sale.
Then the Simplicity patterns have been on sale the most, how can I tell this you ask? Well I have more of this brand than any other brand in the stack. These are just the handbag patterns. Can you tell yet that I love to make bags?
A Couple of Little Girls’ pattern are in the mix even though both of my girls are too old for these style clothes because I really want to make a few of these for gifts,. I can’t help but love them it makes me wish my babies were that small again.
Now this pattern is sized to fit Shae and she really like it, but I don’t think I will make it with so many floral patterns.
There was a New Look pattern in there as well but it was only one so I didn’t take a picture of it. It is a dress pattern for me that I might just have to make.
Ok, so here is the question for you, if you have made it this far. Which one would you like to see me make first? Leave a comment and let me know which one you would like to see and I will try to take pictures in progress.
Thursday, September 22, 2011
Skirt Refashion
All I did was cut a piece of fabric to the correct length and hem is using the Aleen’s Fabric Fusion and then using a few alligator clips to hold it in place and fold the hem of the split back and put a generous amount of adhesive on and adhere it down.
I took extra care and made sure that the top part of the split was adhered securely as well as the bottom edges as these were where the most stress will be placed.
Use the tip of the pen applicator on the Aleen’s Fabric Fusion to run a small bead of adhesive along the edge to insure a secure bond.


